iPhones have a track record of delivering its users with best features such as high-resolution cameras, light, and classy phone designs, memory storage capacities, and lightning fast speed. However, at certain times, your iOS might get piled up with a bunch of unnecessary files that tend to slow the device down. To avoid your device from being clogged, you will have to clean up your equipment off the unnecessary cache regularly.
You might come to face the trouble of wiping your iPhone clean in case you’re planning to sell it off or handing it down to your younger sibling. However, you might not exactly know how to wipe an iPhone off all its existing data. A step by step approach to how to clear the cache on the iPhone can make the entire process easier for you.
Usually, iCloud backs up your device data automatically as long as you are connected to the WiFi and have enough power on the device. However, before you start with the procedure, make sure that you’ve manually backed up your device just to be confident enough.
Step 1: Install Dr.fone software
You will have to go the official site of Dr.fone via your regular browser, on your personal computer. You can either download the software or login to a trial pack easily from the same place. Once the download is successfully completed, open the folder and click ‘Install’ from the pop up a dialogue box. This space gives you a whole range of information about the package, such as terms, policies, and end user license agreement.
This is followed by customization of the language settings of the software as well as the installation path. To start using the program on your computer, click ‘Start Now’, which will direct you to the home screen of the program. Once there, click ‘Login’ and activate the settings using your registration details from Wondershare account.
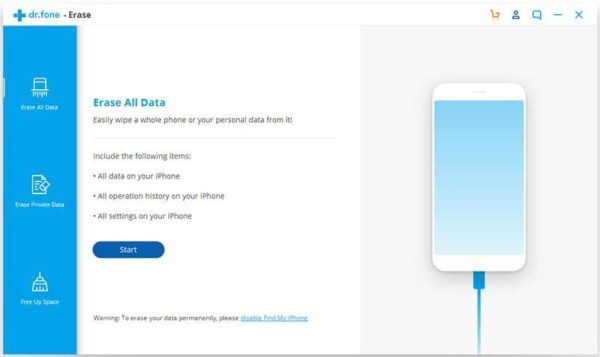
Step 2: Connect your device to the PC
Use a cable to connect your device to the laptop or PC where you have installed the Dr.fone program. A secure connection is established once you follow the required steps on your device. After the completion of the process, you’re shown a number of options from the data eraser program. Select ‘Erase Private Data’ to move to the next step.
Step 3: Scan all your data
The deletion of data doesn’t start immediately as soon as you click the ‘Start’ option. Wait while your device’s data is been scanned by Dr.fone program.
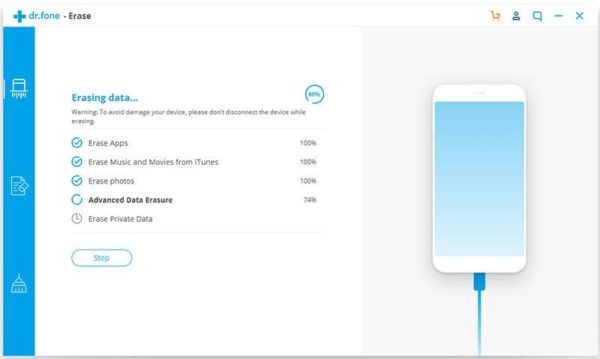
There’s a reason why it is called private data and it is essential that you get rid of these from your device before you consider selling or even if you’re planning to hand it down to a family member. Your computer might take a while to go through all your data as there’s a vast range of files and other crucial data that you can choose to erase using this program.
You can relax, as the entire process is automated and will be followed by a window displaying a list of the data that you’ve selected to be deleted. Once all the data is displayed on the screen, you can move to the next step of removing your information entirely from your iPhone, thus making it efficiently unrecoverable by any software or tool.
Step 4: Clear data permanently
Coming to the final stage of data removal from your iOS, you’ve to select the data that you want to erase from the displayed list. Or if you’re looking for a complete wipeout, you just have to click the ‘Erase’ button.
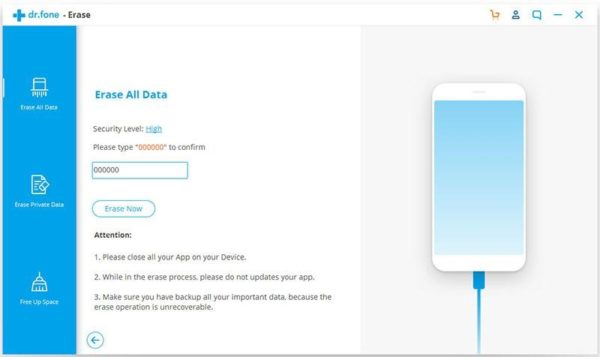
The system carries out an automated process to clean your phone of all information. However, the deleted cache or data is still recoverable and requires another step to be permanently removed.
From a drop-down menu at the top, select all the data that you do not want to be recovered. Enter ‘00000’ as a keyword and click ‘Erase No.’.
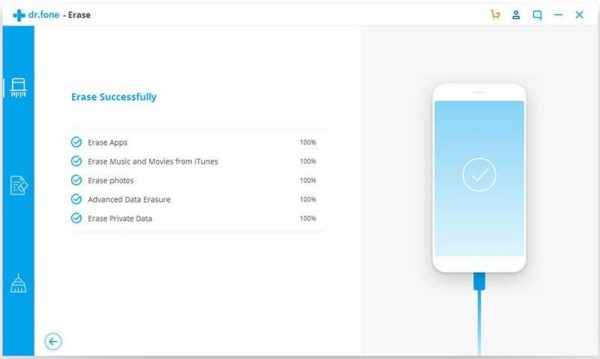
Once the process is complete, you will be displayed with a message notifying the success of deletion of data. Your data will be deleted without a trace, and all this can be handled by Dr.fone in a matter of minutes.
Plagiarism Report: