There are often times when you are on your iPhone and have to capture an essential part of the game you are playing. Alternatively, there could be times when you might need to screen record because of a software issue or bug that has been altering the user experience.
Instances are diverse, and the screen recording feature provides an easy way to capture all these critical moments in the frame for future reference. However, unlike most Android devices with the screen record button in the notification toggle, the same isn’t the case with an iPhone 13.
So, what should you do? We will explore more on that in detail in this article will different aspects as reference.
What is a Screen Recording?
For the users who are entirely new to the concept of screen recording, let us clarify the basic definition first.
Screen recording on an iPhone 13 is like capturing your mobile screen’s activity in a video format instead of a still image, as you do with a screenshot. Access to a screen record allows users to keep track of a software glitch or bug that can be resolved by referencing the video.
In the case of your iPhone 13, you can’t screen record while mirroring the device. So, that’s a factor that you need to be mindful of without any questions asked.
Also Read – How to Unsend iMessage on iPhone That Has Not Delivered
Does iPhone 13 have a Screen Recording Option?
Screen recording is a built-in feature in iOS. However, it is available on iPhones with iOS 14 and above.
There is no need for you to download and install the third-party screen recording applications, which are often considered intrusive to the user’s privacy and security.
However, like in Android smartphones, the screen record option is a feature that is accessible from the iPhone’s Control Center. It isn’t a separate application, so you need to be mindful of it.
How to Set Up the Screen Recorder on Your iPhone 13?
To start the screen recording option on your iPhone 13, your first step in the set-up process is to enable the feature since it is generally disabled in the Settings.
Here’s what you need to do to enable the screen record option from the Control Centerof your iPhone 13:
- Start by unlocking your iPhone and then open the Settings app
- From there, you have to open the Control Centerthat’s at the top of the screen
- Under the Control Center settings, you need to swipe down and then tap on “Screen Recording”. When you tap on the “+” symbol, that shifts the option into the Included Controls list from More Controls.
- Once done, you can check through all the options in your Control Center and rearrange them per your needs.
Following that, you can then go ahead and start the screen recording as you planned.
How to Record your Screen on iPhone 13?
Now that you have added the screen recording button to your iPhone 13’s Control Center, the next thing in line is to know the steps to screen record on the device successfully. Technically, there are two options.
- You can screen record with the audio
- You can screen record without the audio
Whatever you prefer, we will walk you through the steps for both situations, hoping you can pick and follow the steps that best suit your needs.
Also Read – How to Keep Your iPhone Safe and Secure
1. How to Record Screen with Audio on iPhone 13?
When it comes to screen recording with audio, it means that the device will pick up on the sounds that are playing on the device and around the device while the screen recording is in progress.
Following are the steps that you need to follow:
- We assume you have enabled the screen recording button in the Control Center of your iPhone 13. If you haven’t done that, then that’s the first step you must follow.
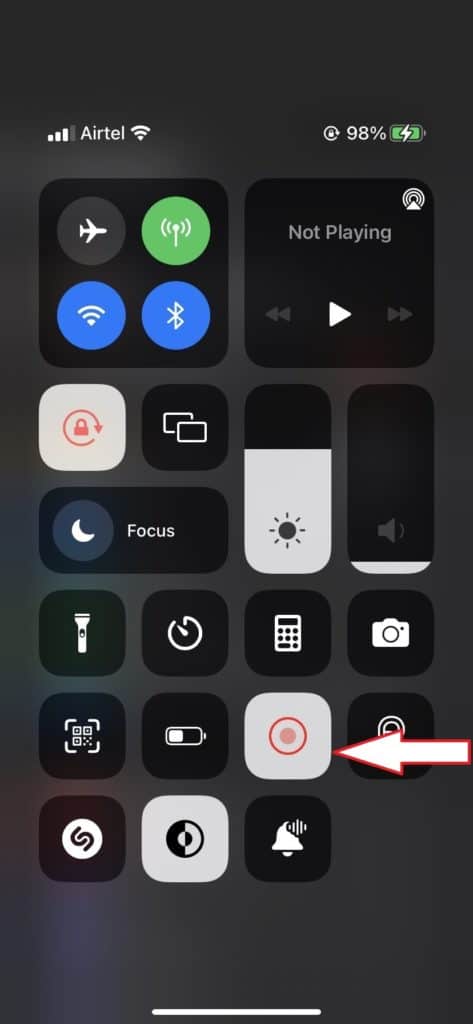
- From your Control Center, you need to find the Screen recording icon, which resembles a solid dot inside a circle.
- Once you find that icon, long-press on it. This will redirect you to another screen where you get to customize the settings for the screen recording that you will take.
- This is where you can enable the microphone to record the screen with the audio. You can help the toggle beside the microphone icon for it.
- Once done, click on Start Recording, which will run a countdown from 3-1 and your screen recording with a start.
- Since your microphone is enabled, you can speak and record your voice throughout the screen for further reference.
Once you are done with the screen recording and want to stop it, you must go to the Control Centre and tap on the Screen Recording icon again. The recorded screen recording is directly saved to your iPhone 13’s videos album, where you can access it.
2. How to Record Screen without Audio on iPhone 13?
If you wish to record the screen of your iPhone 13 without any external audio, the steps are simpler than the first time around.
Here’s what you need to do:
- Start by enabling and moving the Screen Recording option to your Control Center
- Following that, tap once on the Screen Recording icon (solid dot surrounded by a circle)
- This will start the screen recording process, keeping the microphone disabled in your iPhone 13 so no audio is captured.
- Like in the process above, you can tap on the screen recording icon again from the Control Center to turn it off. That’s how simple the steps are. And, as usual, the recorded video is saved to your Videos album in the Gallery.
Where Will the Screen Recording be Saved on iPhone 13?
Every kind of screen recording (with or without audio) on your iPhone 13 is saved to the Video album in your iPhone Gallery app.
If you want to keep it more secure, we’d recommend backing it up to your iCloud so you can access the video from anywhere.
Why Can’t I Screen Record on My iPhone 13?
The above methods explain how you can seamlessly screen record on your iPhone 13. But, what happens when you experience error messages while trying to screen record?
To be fair, a few restrictions could contribute to the error, and we will highlight a few of those possibilities in this section.
You are Playing a Game
If you are in the middle of a game, there are chances that you might not be able to screen record. Sometimes, the Screen Time feature can be the culprit in this case.
Here’s what you can do to overcome the issue:
- Go to Settings on your iPhone 13
- Navigate to Screen Time
- Go to Content and Privacy Restrictions
- Go to Content Restrictions
- Find the Game Center section and then click on “Allow” under Screen Recording
This should enable you to screen record again on the iPhone 13, even in the middle of a game.
You are Screen Mirroring
Another reason that prevents you from screen recording on the iPhone 13 is when you are screen mirroring. So, if you are mirroring, you’d have to close the feature to use the screen recording feature on the iPhone.
Restart the iPhone
Sometimes, momentary software bugs can prevent you from screen recording on the iPhone 13. It is common, and a simple restart of the device should fix the issue immediately.
Update the OS
If you have an outdated version of the iOS on your iPhone 13, it can contribute to temporary glitches and bug issues that can lead to complications surrounding some of the individual features, including screen recording. So, look if your device has a new iOS update and update it to the latest version immediately.
Conclusion
With that, we conclude our article about screen recording on the iPhone 13. The steps are simple, but you must understand that you must follow the basic steps to enable the function in the Control Center before using it. We hope this article walks you through all the basic steps you need to know to get started.